Cordless drills are essential tools, and a dedicated charging station enhances organization. Free printable plans (PDF) simplify building a DIY solution for efficient tool management.
Oamp;H Bakery, known for its Kringle, highlights the importance of quality and tradition, mirroring the value of a well-organized workshop.
Why Build a Charging Station?
Building a dedicated charging station for your cordless drills and batteries solves several common workshop frustrations. Scattered tools lead to wasted time searching, and misplaced chargers risk damage or lost power. A centralized station keeps everything organized, visible, and readily accessible, boosting productivity.
Furthermore, a well-designed station protects your investment in expensive power tools. Free printable plans (PDF) offer a cost-effective way to create a custom solution tailored to your specific needs and space. Like Oamp;H Bakery’s commitment to quality Kringle, a charging station demonstrates a commitment to maintaining and protecting valuable tools.
Implementing a DIY station, especially utilizing French cleat systems, maximizes wall space and allows for easy expansion as your tool collection grows. It’s a practical step towards a more efficient and enjoyable workspace.
Benefits of a Dedicated Drill Station
A dedicated drill charging station offers numerous advantages beyond simple organization. It extends battery life by ensuring proper storage and charging habits, preventing overcharging or complete discharge. This proactive approach, much like Oamp;H Bakery’s meticulous Kringle-making process, preserves quality and longevity.
Utilizing free printable plans (PDF) allows for a customized solution, optimizing space and workflow. A station promotes safety by keeping cords tidy and reducing tripping hazards. It also encourages a more disciplined approach to tool maintenance, fostering a cleaner and more efficient workspace.
Ultimately, a dedicated station saves valuable time and frustration, allowing you to focus on projects rather than searching for tools or dealing with dead batteries. It’s an investment in both productivity and tool care.
Planning Your Drill Charging Station
Planning involves reviewing free printable plans (PDF) to determine material needs and space requirements. Consider French cleat systems for flexible tool organization and storage.
Gathering Tools and Materials
Before commencing construction, meticulously gather all necessary tools and materials, referencing your chosen free printable plans (PDF). Essential tools include a saw (circular or hand saw), drill, screwdriver, measuring tape, and safety glasses.
Materials typically encompass wood – plywood or solid wood depending on the plan – screws, wood glue, and potentially sandpaper for finishing. Consider incorporating a French cleat system, requiring additional wood for cleats.
Cord management solutions like cable ties or cord organizers are also crucial. Oamp;H Bakery’s dedication to quality ingredients mirrors the need for durable materials in your build. Ensure you have appropriate mounting hardware if wall-mounting the station.
Essential Safety Precautions
Prioritize safety throughout the build, mirroring Oamp;H Bakery’s commitment to quality and care in their Kringle production. Always wear safety glasses when cutting or drilling wood to protect your eyes from debris. Utilize a dust mask to avoid inhaling sawdust, especially during sanding.
When using power tools, ensure a clear workspace and follow manufacturer’s instructions diligently. Securely clamp wood pieces before cutting or drilling to prevent movement. If your free printable plans (PDF) involve electrical components, disconnect power before working on wiring.
Be mindful of cord management to prevent tripping hazards. A well-organized station, like a well-run bakery, minimizes risks.
Choosing the Right Wood for Construction
Selecting appropriate wood is crucial, much like Oamp;H Bakery’s choice of ingredients for their Kringle. Pine is a cost-effective and easily workable option for a DIY drill charging station, suitable for many free printable plans (PDF). However, consider hardwood like oak or maple for increased durability and a more premium finish.
Plywood offers stability and affordability, especially for larger panels. Ensure the wood is kiln-dried to prevent warping or cracking over time. Check for knots and imperfections that could compromise structural integrity.
Consider the wood’s thickness based on the weight of your drills and tools. A robust build, like a perfectly layered Kringle, requires a solid foundation.
Design Options & Plans
Explore diverse plans, from simple wall mounts to French cleat systems, often available as free printable PDF guides for a customized drill charging station.
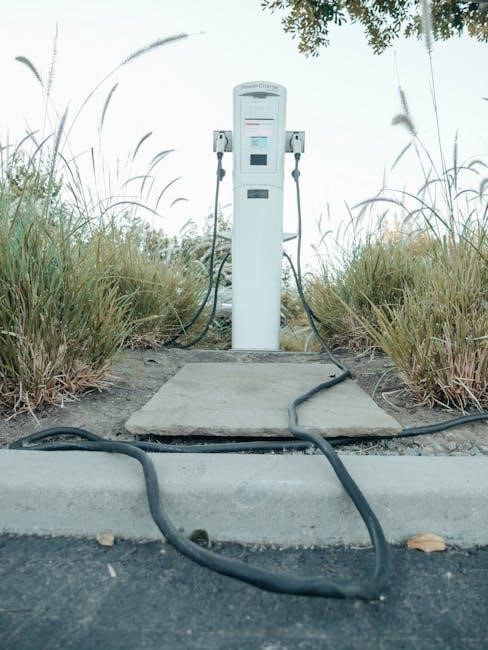
Simple Wall-Mounted Charging Station Design
A straightforward approach involves a wall-mounted station, ideal for limited spaces. Free printable plans (PDF) often showcase designs utilizing basic lumber and readily available hardware. These plans typically feature slots or shelves to accommodate drill bodies and dedicated spaces for battery chargers.
Construction is generally uncomplicated, requiring minimal woodworking experience. Focus on secure mounting to wall studs for stability and safety. Consider adding a small shelf above for bit storage, enhancing organization. Many online resources provide step-by-step instructions alongside material lists, making this a beginner-friendly DIY project. The simplicity allows for quick assembly and a clean, functional charging solution, mirroring the efficiency of Oamp;H Bakery’s streamlined processes.
French Cleat System for Tool Organization
Employing a French cleat system offers exceptional versatility for a drill charging station. Free printable plans (PDF) demonstrate how to create interlocking wall-mounted rails, allowing for easy rearrangement of tool holders and chargers. This method excels at adapting to evolving tool collections and workshop layouts.
Individual tool holders, also constructed with French cleats, can be customized to fit specific drill models and battery types. The system’s modularity enables expansion and reconfiguration as needed. Like Oamp;H Bakery’s diverse Kringle flavors, this system offers customizable options. Secure mounting is crucial, ensuring the cleat system can support the weight of tools and batteries. Numerous online guides provide detailed instructions and cutting lists for a successful build.
Workbench Integrated Drill Station Plan
Integrating a drill charging station directly into your workbench maximizes space and efficiency. Free printable plans (PDF) often showcase designs that incorporate dedicated slots for drills, batteries, and chargers within the workbench structure. This approach keeps essential tools readily accessible during projects, streamlining workflow.
Consider incorporating a pull-out shelf or a flip-up panel to conceal the charging station when not in use, maintaining a clean workspace. Similar to Oamp;H Bakery’s commitment to quality, a well-integrated station enhances the overall workshop experience. Ensure adequate ventilation for charging batteries and prioritize safety by keeping electrical components protected. Detailed plans will specify dimensions and materials for a robust and functional addition to your workbench.

Construction Steps
Follow your free printable plans (PDF) closely, starting with precise wood cutting. Assemble the frame securely, then install cord management for a tidy, functional station.
Cutting the Wood According to Plan
Precisely follow the dimensions outlined in your free printable cordless drill charging station plans (PDF) when cutting the wood. Accuracy at this stage is paramount for a stable and aesthetically pleasing final product. Utilize a circular saw or hand saw, ensuring clean, straight cuts.
Double-check measurements before each cut, referencing the PDF plan frequently. Consider using a speed square to guarantee 90-degree angles. Label each piece of wood immediately after cutting, corresponding to the plan’s labeling system – this prevents confusion during assembly.
Remember safety glasses and ear protection! Smooth any rough edges with sandpaper to prevent splinters and ensure a professional finish. A well-executed cut list, guided by the PDF, sets the foundation for a successful build.
Assembling the Charging Station Frame
With the wood cut according to your free printable cordless drill charging station plans (PDF), begin assembling the frame. Utilize wood glue and screws for a robust connection, following the PDF’s specified joinery methods. Pre-drilling screw holes prevents wood splitting, especially with hardwoods.
Ensure the frame is square during assembly – a framing square is invaluable here. Clamps are essential to hold pieces firmly together while the glue dries. Regularly check alignment against the PDF plan, making adjustments as needed.
Pay close attention to the orientation of each piece, as indicated in the PDF. A solid frame is the backbone of your charging station, providing stability for tools and accessories.
Installing Cord Management Solutions
Effective cord management is crucial for a tidy drill charging station, and your free printable cordless drill charging station plans (PDF) may include dedicated features. Consider cable ties, cord clips, or even small hooks to route charging cables neatly.
Strategically placed holes, as shown in the PDF, allow cables to pass through the frame, concealing them from view. Avoid overcrowding; leave enough slack for easy tool access.
For French cleat systems, integrate cord channels directly into the cleat boards. Remember, a well-organized charging station not only looks better but also prevents tripping hazards and cable damage.
Power & Electrical Considerations
Free printable plans won’t detail electrical work; always use existing, safe outlets. Verify your drill’s voltage and amperage needs before installation.
Using Existing Outlets Safely
Free printable plans for a cordless drill charging station typically focus on the woodworking aspects, and often overlook crucial electrical safety considerations. When utilizing existing outlets, prioritize safety above all else. Never overload a circuit; determine the total wattage of all devices connected to that outlet.
Inspect outlets for any signs of damage, such as cracks or loose wiring. If issues are detected, consult a qualified electrician before proceeding. Consider using a surge protector to safeguard your drill and charger from power fluctuations. Ensure the charging station is positioned to prevent accidental contact with water or other liquids.
Remember, a properly grounded outlet is essential for safe operation. Like Oamp;H Bakery’s commitment to quality, a safe electrical setup is paramount for a functional and worry-free workshop.
Voltage and Amperage Requirements
Free printable cordless drill charging station plans rarely detail specific electrical requirements, leaving this critical aspect to the builder. Most cordless drill chargers operate on standard 120V AC power in North America, but verifying the charger’s label is crucial.
Amperage is equally important. The charger will specify its amperage draw; ensure the circuit can handle this load in addition to other devices. Overloading a circuit can trip breakers or, worse, create a fire hazard. Using a dedicated circuit for the charging station is ideal.
Just as Oamp;H Bakery meticulously follows recipes, precise adherence to electrical specifications is vital. Incorrect voltage or insufficient amperage can damage the charger or drill battery.
Customization & Enhancements
Free printable plans offer a base; personalize your drill charging station with LED lighting, extra storage, or paint—like Oamp;H Bakery’s Kringle flavors!
Adding LED Lighting
LED strip lights dramatically improve visibility around your drill charging station, especially in dimly lit workshops. Integrating lighting isn’t complex, even with free printable plans as a guide. Consider adhesive-backed LED strips mounted under shelves or along the station’s frame.
These provide focused illumination where you need it most – when grabbing a drill or locating accessories. Powering the LEDs can be achieved through a simple USB connection or a small AC adapter, ensuring safety and convenience.
Think of Oamp;H Bakery’s beautifully lit display cases; similarly, well-lit tools are more accessible and inviting to use. A little illumination transforms a functional space into a more pleasant and efficient workspace.
Incorporating Additional Tool Storage
Beyond drill charging, maximize your station’s utility by adding storage for bits, drivers, and other frequently used accessories. Many free printable plans can be adapted to include small shelves, drawers, or pegboard sections. Consider French cleats, as mentioned in online resources, for versatile hanging storage.
This modular approach allows customization as your tool collection grows. Think about dedicated slots for various bit types or a small compartment for safety glasses and work gloves.
Just as Oamp;H Bakery carefully displays its Kringle varieties, a well-organized tool station showcases and protects your investments. Efficient storage reduces clutter and streamlines your workflow, making projects faster and more enjoyable.
Personalizing with Paint or Stain
Once constructed, personalize your drill charging station with paint or stain to match your workshop’s aesthetic. A fresh coat of color not only enhances appearance but also protects the wood from moisture and wear. Consider using durable enamel paints for easy cleaning, especially if working with messy materials.
Just as Oamp;H Bakery presents its Kringle with appealing finishes, a thoughtfully finished station elevates your workspace. Staining can highlight the wood grain, adding a touch of warmth and sophistication.
Remember to apply multiple coats for optimal protection and a professional look. This final step transforms a functional build into a personalized feature of your workshop.

Finding Free Printable Plans (PDF)
Free printable plans for cordless drill charging stations are readily available online, simplifying DIY builds. Explore resources for convenient PDF downloads!
Online Resources for Drill Station Plans
Numerous websites offer free printable plans for building a cordless drill charging station. A quick online search reveals a wealth of DIY projects catering to various skill levels and workshop spaces. Platforms like woodworking forums and dedicated DIY blogs frequently host user-submitted plans, often available as downloadable PDF files.
Websites specializing in garage organization and tool storage are excellent starting points. These resources often feature detailed diagrams, material lists, and step-by-step instructions. Remember to carefully review the plans before starting construction, ensuring they align with your available tools, materials, and desired aesthetic. Consider checking sites like Instructables and Pinterest for inspiration and downloadable PDF blueprints.
Don’t overlook video tutorials on platforms like YouTube, which can visually guide you through the building process, complementing the free printable plans.
Key Features to Look for in a Plan
When selecting a free printable cordless drill charging station plan (PDF), prioritize clarity and completeness. A good plan should include detailed dimensions, a comprehensive materials list, and clear, step-by-step instructions. Look for plans that specify wood types and fastener sizes for optimal stability and durability.
Consider plans incorporating features like French cleats for versatile tool organization and easy customization. Effective cord management solutions are crucial – look for designs that include cable routing or dedicated spaces for chargers. Ensure the plan suits your workshop’s size and layout.
Finally, assess the plan’s complexity; choose one that matches your skill level to avoid frustration and ensure a successful build. Prioritize safety features within the design.
Maintenance & Upkeep
Regular cleaning prevents dust buildup, ensuring optimal functionality. Inspect the charging station for loose screws or wear, maintaining safety and longevity of your DIY build.
Regular Cleaning and Dust Removal
Consistent cleaning is paramount for maintaining a functional and safe drill charging station. Dust accumulation, particularly around electrical components, can impede performance and potentially create a fire hazard. Utilize a soft brush or a vacuum cleaner with a brush attachment to gently remove dust from the wood surfaces, charging ports, and any integrated LED lighting.
Avoid using abrasive cleaners or excessive moisture, as these can damage the wood finish or electrical connections. A slightly damp cloth can be used for stubborn grime, but ensure everything is thoroughly dried afterward. Remember Oamp;H Bakery’s dedication to quality – apply the same care to your workshop organization! Regular upkeep, like their Kringle-making process, ensures lasting results.
Prioritize cleaning around the cord management solutions to prevent dust bunnies from hindering cable access. This simple routine will extend the life of your DIY project.
Inspecting for Wear and Tear
Regular inspections are crucial for ensuring the longevity and safety of your drill charging station. Examine the wood frame for any signs of cracking, splitting, or loosening joints. Tighten screws or re-glue sections as needed, mirroring the meticulous attention to detail found in Oamp;H Bakery’s Kringle production.
Check the cord management solutions for fraying or damage, replacing them if necessary to prevent electrical hazards; Inspect charging ports for loose connections or signs of overheating. Ensure all LED lighting (if installed) is functioning correctly and that wiring is secure.
Like maintaining a prized possession, proactive inspection prevents minor issues from escalating into costly repairs. A well-maintained station, built from free printable plans, will serve you reliably for years.